RS-485 camera interfacing with Raspberry Pi
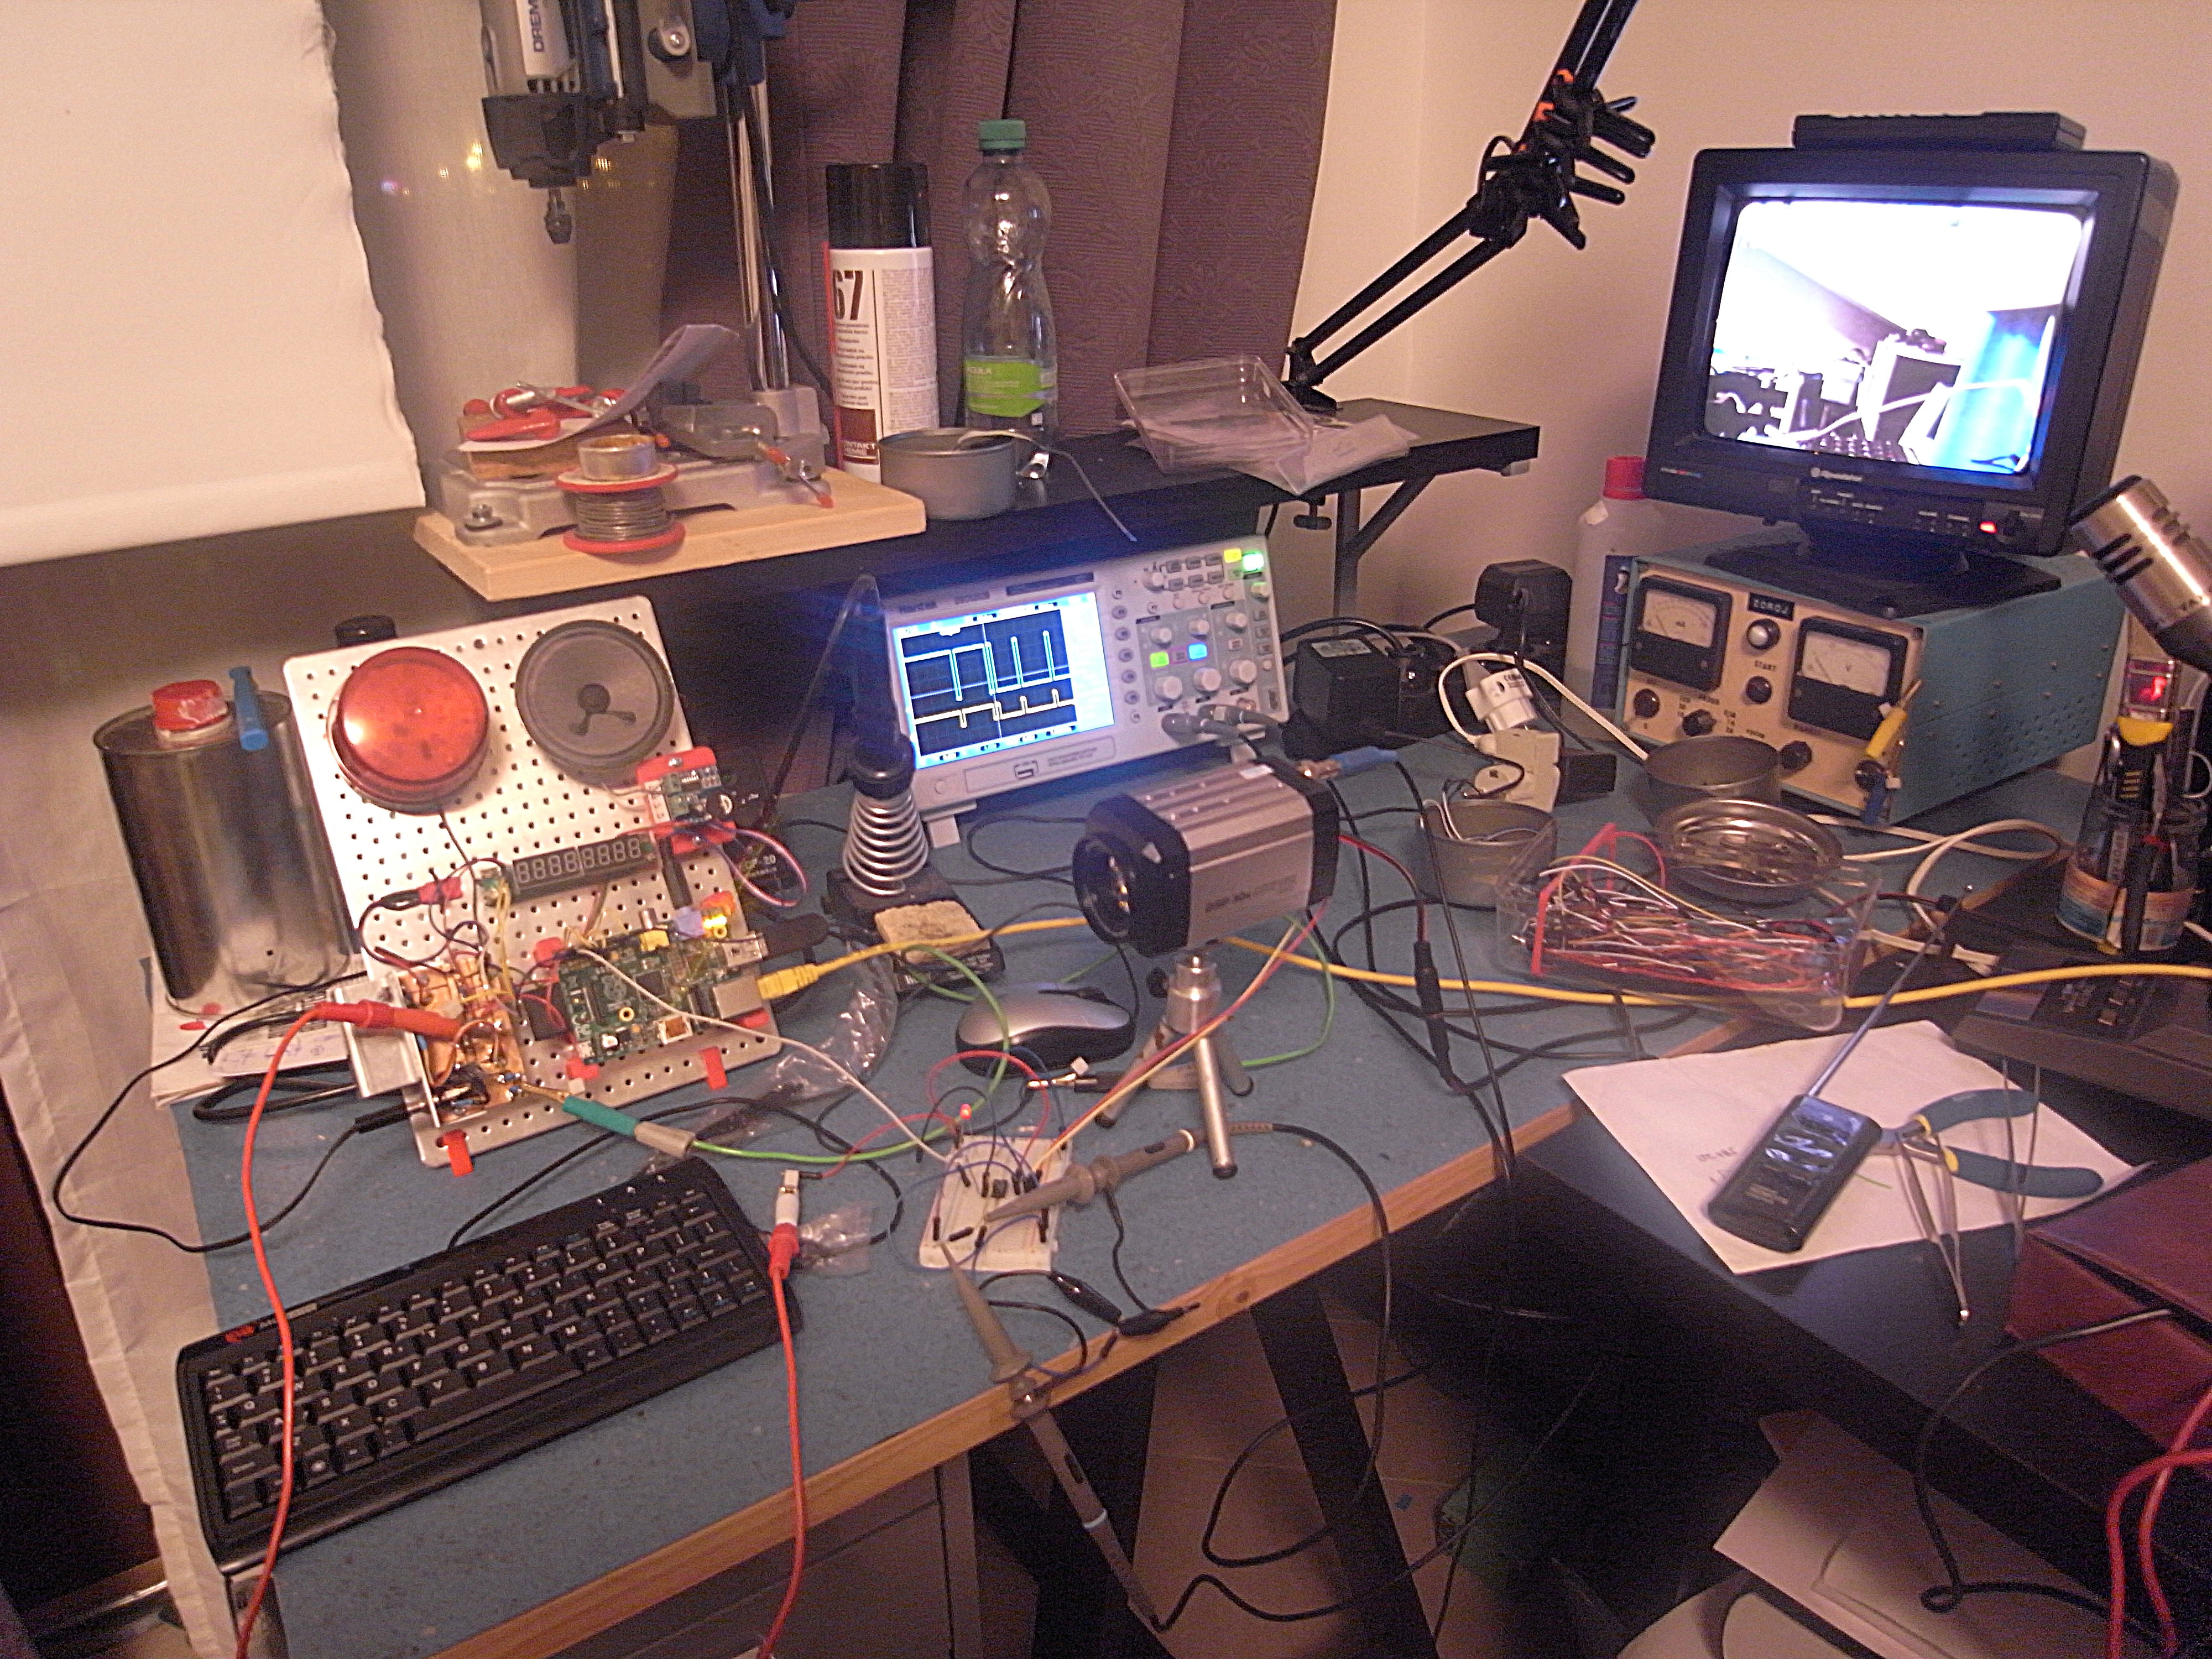
I bought a camera from China for my SSTV ham radio station. The camera type is SCB30X2S-A42T, it is CCTV camera with 30x optical zoom, 420 TV lines, PAL composite video output and it has a radio remote control which allows to zoom, focus and enter a settings menu.
I bought it from a shop is on Ebay, where you can find some detail photos of it. Or download a manual page.
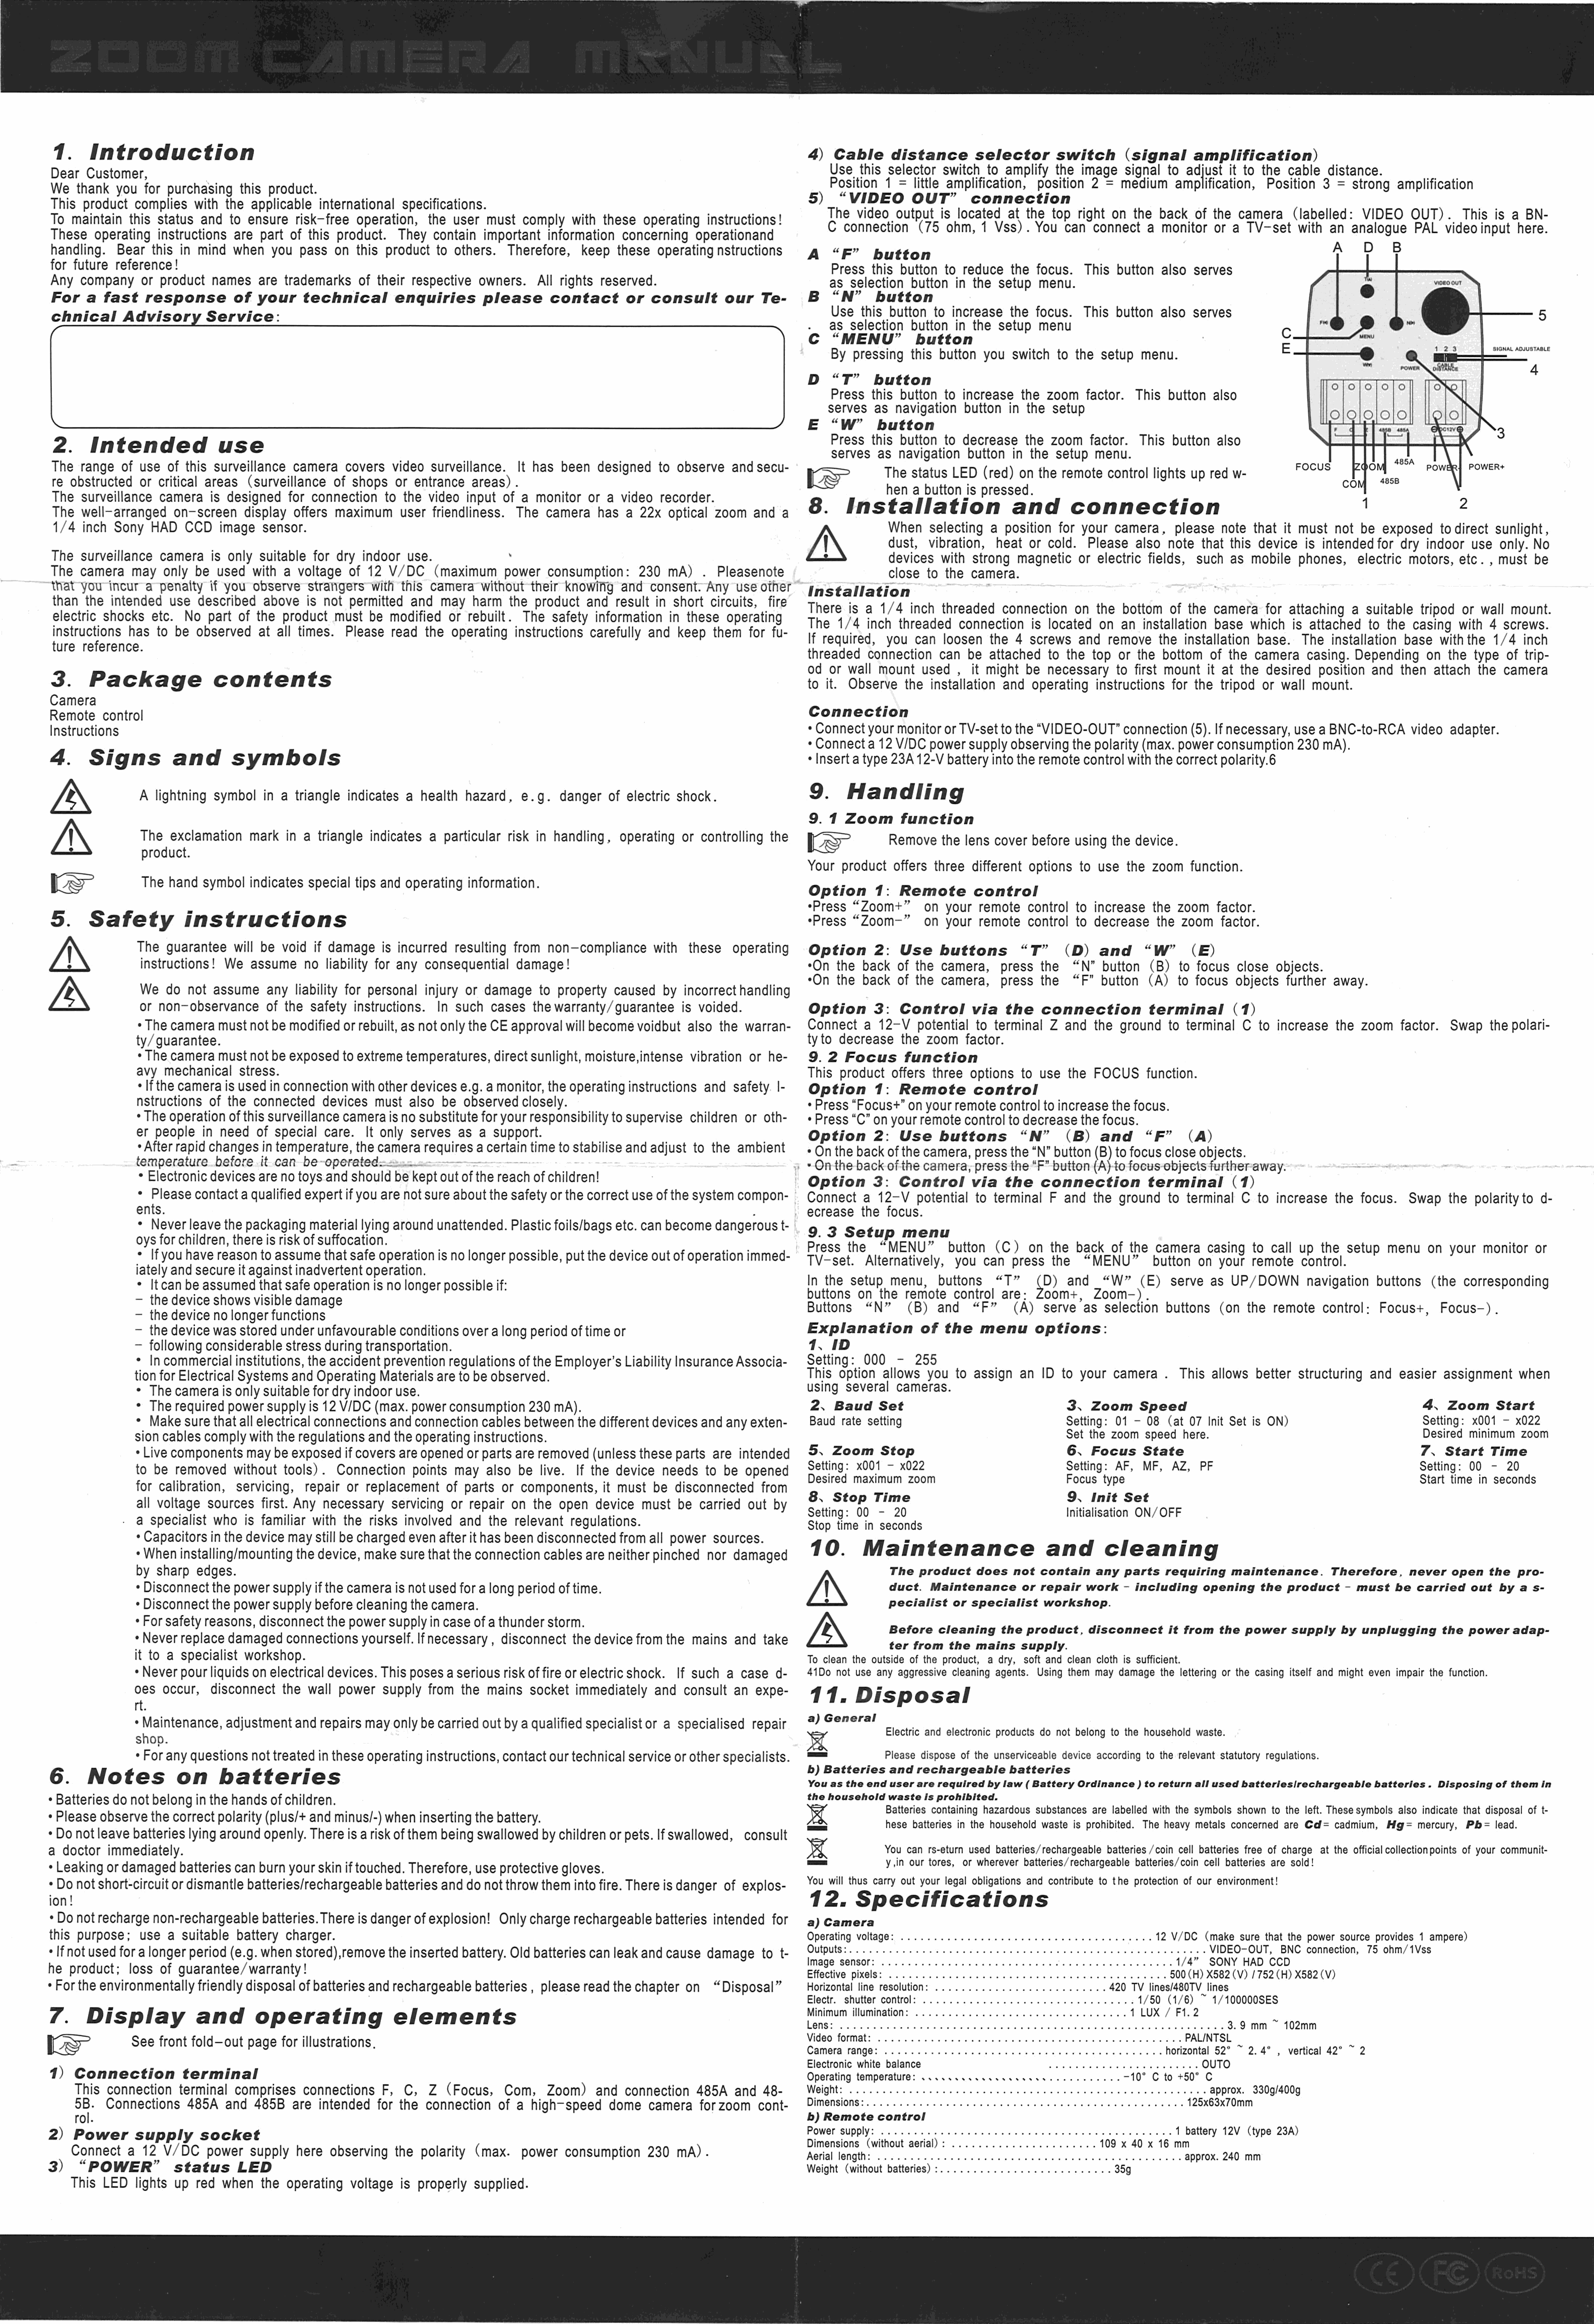
I've realized that the camera has more control options instead a remote/keyboard control. There are connectors F, C, Z which can control focus and zoom by connecting +/- 12V between F-C and Z-C and connectors A, B of RS-485.
RS-485 is a serial interface industry standard for data transfers on hundred meters long two-wire lines. A nice article about RS-485 is on wikipedia.
The serial protocol used for many CCTV cameras and other security devices is called Pelco-P or different one Pelco-D. These protocols defines format of serial data transmission and which bits are used for different camera functions. In my case, it was only zoom, focus, but there is also support for camera equipped with motor for its positioning. I've tried to use both of them, but my camera functions worked just with Pelco-D (for Pelco-P only zoom worked). Specification of Pelco protocols can be found on internet, I've mirrored them locally:
Connect RS-485 via RPi's UART
Universal asynchronous receiver/transmitter (UART) takes bytes of data and transmits the individual bits in a sequential fashion. At the destination, a second UART re-assembles the bits into complete bytes.
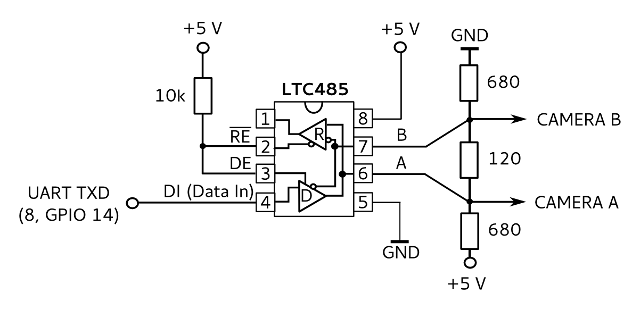
RPi's GPIO pins of UART are 8 for TXD (GPIO 14) and 10 for RXD (GPIO 15). GPIO voltage levels are 3.3 V! Logic 0 (L) is 0.0 V and logic 1 (H) is 3.3V level.
For interfacing RS-485 with RPi is necessary integrated circuit which will convert its serial port (UART) voltage levels into RS-485 voltage levels. I've choose LTC485 for less then $1. Used wiring for camera interfacing contains just simple connections between RPi, data input part of IC and camera, thanks to few centimeters between all components. In real life, there must be some resistors added because long twisted wire impedance matching to avoid signal reflection.
Control RPi's serial port from command line
RS-485 camera interfacing with Raspberry Pi is quite simple. First check if serial console is disabled. Second you need to set a parameters of UART line. It is 8 bits, no parity, one stop bit, speed is usually 2400 Bauds. Be sure that your Linux user has right to access RPi's serial port named /dev/ttyAMA0:stty -F /dev/ttyAMA0 ospeed 2400 -ignpar cs8 -cstopb -echo
Settings of UART on my RPi are following:
# stty -F /dev/ttyAMA0
speed 2400 baud; line = 0;
min = 1; time = 0;
-brkint -icrnl -imaxbel iutf8
-isig -icanon -iexten -echo -echoe -echok -echoctl -echoke
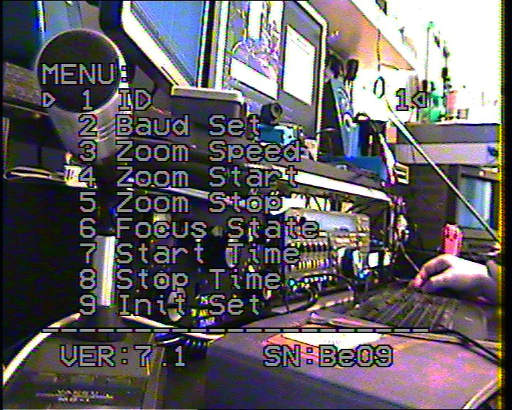
Fig.: Frame grabbed by USB dongle with STK1160 video digitizer chip. Notice menu with ID set to 1. It is the address 0x1 and it is used in hexadecimal commands to control the camera.
Now you can easily write data to port. In following example I'm sending to camera with address 0x01 two commands: the first is for zooming followed by stop command. It will zoom in just for a bit, without stop command camera continues zooming until it reach maximum zoom.
printf '\xFF\x01\x08\x20\x00\x00\x29\xFF\x01\x00\x00\x00\x00\x01' > /dev/ttyAMA0
I've created helper bash script d_pelco (and p_pelco) to send commands as hexadecimal numbers. It formats them for printf output and also check sum (or xor) is counted:
#!/bin/bash
PORT="/dev/ttyAMA0"

SYNC=ff #BYTE1
ADDR=01 #BYTE2
BYTE3=${1:-0}
BYTE4=${2:-0}
BYTE5=${3:-0}
BYTE6=${4:-0}
SUM=0  #BYTE7

# Count SUM
hex=''
for i in $* ; do hex+="0x$i "; done
a="0x$ADDR $hex"
SUM=$(eval printf %x $(( ( ${a// /+} 0x0 ) & 0xff )) )

echo "Pelco 'D': $SYNC $ADDR $BYTE3 $BYTE4 $BYTE5 $BYTE6 $SUM"

# Write to port
printf "\x$SYNC\x$ADDR\x$BYTE3\x$BYTE4\x$BYTE5\x$BYTE6\x$SUM" > "$PORT"
My camera supports following commands:
- ./d_pelco – stop command (default values)
- ./d_pelco 00 00 – stop command; exit menu
- ./d_pelco 08 00 – enter menu; if camera is in menu then exit
- ./d_pelco 08 20 – zoom tele/zoom in; menu up
- ./d_pelco 08 40 – zoom wide/zoom out; menu down
- ./d_pelco 01 00 – focus near ; menu left (set lower value)
- ./d_pelco 00 80 – focus far ; menu right (set higher value)
In specification above you can find also some PTZ commands for specific functions like adding text label on a screen or setting of several camera function. I was playing with it, but it is look like that those commands are not supported.
I've created more sophisticated script d_control for the camera control over SSH. Cursor up/down keys are used for zoom, left/right for focus and key m for enter and exit menu:
#!/bin/bash

function debug() {
    echo "DEBUG:" $*
}

function camera_zoom_in() {
    debug "Zooming in"
    ./d_pelco 08 20; ./d_pelco 00 00;
}

function camera_zoom_out() {
    debug "Zooming out"
    ./d_pelco 08 40; ./d_pelco 00 00;
}

function camera_focus_near() {
    debug "Focusing near"
    ./d_pelco 01 00; ./d_pelco 00 00;
}

function camera_focus_far() {
    debug "Focusing far"
    ./d_pelco 00 80; ./d_pelco 00 00;
}

function camera_zoom_max() {
    debug "Zoom set to max"
    ./d_pelco 08 20;
}

function camera_zoom_min() {
    debug "Zoom set to min"
    ./d_pelco 08 40;
}

function camera_menu() {
    debug "Menu invocation"
    ./d_pelco 08
}

function camera_control() {
    local key_press="$1"
    case "$key_press" in
        "[A") camera_zoom_in ;;    # Cursor Up
        "[B") camera_zoom_out ;;   # Cursor Down
        "[C") camera_focus_far ;;  # Cursor Right
        "[D") camera_focus_near ;; # Cursor Left
        \?) echo ;;
    esac
}

while :
do
    # Read key press, 1 byte
    read -rsn1 -d '' PRESS
    # Store its value as hex number
    printf -v KEY "%#x" \'$PRESS
    debug KEY=$KEY

    # Perform operation after keypress
    if (( KEY == 0x1b )) ; then
        # Cursor key starts with ESCAPE 0x1b character
        debug "Special char!"
        read -rsn2 -d '' PRESS # two more bytes with cursor code
        debug "KEY=$PRESS"
        camera_control $PRESS
    elif (( KEY == 0x6d || KEY == 0x4d )) ; then
        # Key 'M' or 'm'
        debug "Menu"
        camera_menu
    elif (( KEY == 0x7a || KEY == 0x5a )) ; then
        # Key 'Z' or 'z'
        camera_zoom_min
    elif (( KEY == 0x78 || KEY == 0x58 )) ; then
        # Key 'X' or 'x'
        camera_zoom_max
    fi
done
To use this, you need to download d_control and d_pelco to a same directory. These bash scripts are intended as an example of camera/serial port control, for some serious work better program should be developed.