Meteosat station in GNU/Linux
Martin “BruXy” Bruchanov,bruxy@regnet.cz
© 2012
Abstract: This document describes installation of DVB-S card into GNU/Linux for EUMETCAST reception purposes, but the first part is suitable also for configuration of satellite TV (DVB-S) reception.
Reception setup in steps
- Get registration for EUMETCAST reception.
- Install proper DVB card (Technisat Skystar 2).
- Install and setup parabolic antenna for Eurobird 9).
- Network installation – dvbnet, ifconfig, smcroute
- Encryption tools installation – Alladin eTokend, PC/SC Lite
- Tellicast client installation.
- Get software for image processing.
- Setup utilities for automatic file erasing, reception and EKU monitoring.
GNU/Linux software packages needed for reception
All software below is located on EUMETSAT CD, which get every licenced user. Older versions of EUMETSAT CDs officially supported version of Linux is 2.4.x. Using it with kernel 2.6.x needs another setup of network device and small editing of start up scripts of etokend and tellicast-client. Since version 5.5 are officially supported 2.6.x kernels and GNU/Linux distributions based on RPM or DEB packages.
- Utilities for DVB reception linux-dvb-apps:
- szap – tune to DVB-S channel,
- dvbnet – control digital data network interfaces,
- femon – signal quality monitoring,
- SMCRoute – tool to manipulate the multicast routes of the Linux kernel.
- Encryption Key Unit (EKU) control:
- PCSC-Lite – coordinates communications with smart-card readers and smart cards and cryptographic tokens that are connected to the system
- Support for Alladin eToken.
- TELLICAST Multicast Distribution System Client – reception and decoding of EUMETCAST files.
Why use GNU/Linux instead of Microsoft Windows? I have experiences with Windows XP too and it was not walk through the rose garden. There was problem with driver setup and after many experiments and restarts it leads to complete Windows reinstallation...
- GNU/Linux is more stable. It is not necessary to restart computer for months.
- GNU/Linux is more transparent. No more headaches caused by yellow T-icon without obvious reasons.
- Standard GNU/Linux distributions contains many useful utilities and system tools for process automation immediately after installation.
- GNU/Linux is free.
- Some users claim that popular software from David Taylors works with WINE (Windows API wrapper for Linux) or you can use xrit2pic or msg2pgm.
PC hardware configuration
EUMETSAT recommends two PCs with minimum 2.0 GHz Pentium™ IV; 1GB RAM, 36GB hard disk. One PC for data reception, second for image processing. I'm using only one PC with double core Pentium™ IV CPU 2.60GHz processor, 2 GB RAM, and 200GB hard disk. This PC with operating system GNU/Linux (Fedora release 7 – Moonshine, kernel version 2.6.23.17-88.fc7) is doing both the reception and the processing. There is also web server for access to generated images. No performance problem found with this configuration
Technisat Skystar2
I'm using PCI version of Skystar2. The operating system use this card as network device.
- Card detail:Techsan Electronics Co Ltd B2C2 FlexCopII DVB chip / Technisat SkyStar2 DVB card (rev 02).
- Received band:950,000 kHz — 2,150,000 kHz.
- Tunning step: 125 kHz.
- Symbol speed: 1,000,000 S/s — 45,000,000 S/s.
- Symbol speed tolerance: 500 ppm.
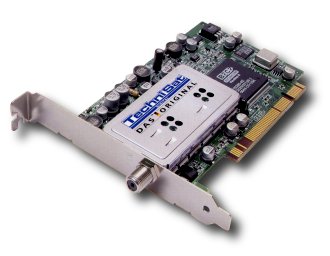
Figure: TechniSat Skystar2 PCI card.
After card installation check: dmesg | grep -E "DVB|b2c2"
b2c2-flexcop: B2C2 FlexcopII/II(b)/III digital TV receiver chip loaded successfully
DVB: registering new adapter (FlexCop Digital TV device)
b2c2-flexcop: MAC address = 00:d0:d7:12:6b:6f
b2c2-flexcop: found the stv0299 at i2c address: 0x68
DVB: registering frontend 0 (ST STV0299 DVB-S)...
b2c2-flexcop: initialization of 'Sky2PC/SkyStar 2 DVB-S' at the 'PCI' bus controlled by
a 'FlexCopIIb' complete
Related output of command lspci:
03:02.0 Network controller: Techsan Electronics Co Ltd B2C2 FlexCopII DVB chip / Technisat SkyStar2 DVB card (rev 02)
The Linux kernel should load all necessary modules automatically, so check it with command lsmod:
stv0299                12745  1
b2c2_flexcop_pci        9817  13
b2c2_flexcop           25165  1 b2c2_flexcop_pci
dvb_core               69481  2 stv0299,b2c2_flexcop
i2c_core               21825  3 stv0299,b2c2_flexcop,i2c_i801
If you have antenna positioned to Eurobird 9, tune to proper channel and test signal quality.
Antenna installation
The antenna installation is an important part of the station set-up. You will need following things:
- Tools: Two open-end wrenches 17 and 13, adjustable spanner (french key) for tightening.
- Impact drill and set of steels.
- Universal Low-noise Block (LNB) converter for Ku band (10.7 to 12.75 GHz).
- Parabolic off-set antenna, recommended size is 85 cm, but choose larger if you need longer coax cable. Check this map and signal coverage too.
- Two male F-connectors.
- Coax cable.
- Antenna handle, wall plugs and screws.
- Self-vulcanization tape for a connector protection.
- DVB-S computer reception card, e. g. Skystar 2 or tunned receiver.


Figure: A material prepared for installation and installed antenna.
Installation procedule
- Find the proper place – clear view to the south with good access.
- Calculate approximate elevation and azimuth for your location. Accurate match you will accomplish through the signal strength.
- Install antenna – drill holes, attach antenna holder and dish, etc.
- Put connectors to coaxial cable.
- Connect reception device, you will set the proper position by signal strength.
- Set the elevation, you will tune it later.
- Slowly set the azimuth, watch the signal strength and find the best signal quality
- Try to set the elevation again and find the best signal.
Network configuration for reception setup
For start of EUMETCast reception I created scripts described bellow. The knowledge of mechanism and system configuration is useful for reception debugging and will be described in next chapters.
- Download: eumetcast_setup.tar.gz
- Uncompress it into /usr/local/bin:
tar xvzf eumetcast_setup.tar.gz -C /usr/local/bin
- Edit eumetcast_chanells.csv, uncomment lines with channels you want to receive (delete # character at line start).
- You can start the network with eumdvb_start and stop it with eumdvb_stop.
- If you like to start DVB network automatically when Linux starts create
symbolic links in directory with starting scripts:
ln -s /usr/local/bin/eumdvb_start /etc/rc3.d/S76eumdvb_start
ln -s /usr/local/bin/eumdvb_stop /etc/rc3.d/K76eumdvb_stop
Tune the card for EUMETCast channel
For European user is the EUMETCast distributed in Ku band by the Eurobird™ 9 satellite:
| Satellite: | Eurobird™ 9 |
| Position: | 9° East |
| Transponder: | TP63 |
| Downlink: | 11976.82 MHz |
| Symbol rate: | 27500 kS/s |
| FEC: | 3/4 |
| Polarisation: | horizontal |
Use the szap and frequency configuration file /etc/chan_eumetcast.conf. This file contains channel configuration for tunning, on first line is:
EUMETCast:11976:h:0:27500:0:0:231
Start reception with following command (option -c define another channel list and -n sets number of line with EUMETCast frequency):
/usr/bin/szap -c /etc/chan_eumetcast.conf -n 1
When reception and signal quality is all right you will see:
zapping to 1 'EUMETCast':
sat 0, frequency =  11976 MHz H, symbolrate 27500000, vpid = 0x0000, apid =
0x0000
using '/dev/dvb/adapter0/frontend0' and '/dev/dvb/adapter0/demux0'
status 01 | signal bba9 | snr 74eb | ber 0000a5f3 | unc 00000000 |
status 1f | signal babe | snr d7b8 | ber 0000051d | unc 00000000 | FE_HAS_LOCK
status 1f | signal baac | snr d7b8 | ber 00000000 | unc 00000000 | FE_HAS_LOCK
status 1f | signal b8ea | snr d7d3 | ber 00000000 | unc 00000000 | FE_HAS_LOCK
The output columns have following meaning:
- status – demodulator information, the value must be
0x1f (everything okay). The status bits meaning is:
- 01, FE_HAS_SIGNAL ... detected signal over noise level
- 02, FE_HAS_CARRIER ... detected DVB signal
- 04, FE_HAS_VITERBI ... FEC is stable
- 08, FE_HAS_SYNC ... synchronisation bytes found
- 10, FE_HAS_LOCK ... everything works
- 20, FE_HAS_TIMEOUT ... no demodulator fetch in last 2 seconds
- 40, FE_HAS_REINIT ... reinitialization of front-end
- signal – quality should be better then 0x8000 (50 %)
- SNR – Signal to Noise Ration, should be better then 0x8000
- BER – Bit Error Rate, the lower is better
- unc – Number of uncorrected block, only low values acceptable
The szap must run while reception is on, because it is running in the background there is a utility femon for signal quality monitoring. It has same output as szap. When you notice reception problem, first try to check signal quality. The Ku band – 10GHz frequency band has one unpleasant matter, the super high frequency signal is attenuated by heavy snowing or raining.
Before network startup tune the DVB device:
szap -c /etc/chan_eumetcast.conf -n 1 > /dev/null &
Switch of RP filter
The reverse path filter (RP filter) blocks incoming packets if source address doesn't correspond with network interface where packet comes (it is used as security against IP spoofing). Indeed if computer has more IP addresses on different interfaces or one interface has more IP assigned then system should deny requested packets. For RP filter disabling use:
echo 0 > /proc/sys/net/ipv4/conf/all/rp_filter
Create virtual network interfaces
This part of setup corresponds with EUMETCast channels you want to receive. Because on the one satellite frequency is streamed more services (time multiplex), it is needed to choice proper data. Service packets are distinguished by its PIDs (Packet Identification) and further by multicast IP address of each EUMETCast channel.
The whole list of EUMETCast services and its PID can be found on EUMETSAT pages (Reception Station Set-up).
For example, you are interested to receive MSG-9 Primary High Rate SEVIRI, MSG-8 Rapid Scanning Service, images of Indian ocean from Meteosat 7, MetOp and NOAA AVHRR Imagery. You will also need to receive TSL Announcement Channel and channels with service status informations and administrative announcements. For these services you can find following PIDs and IP addresses:
| Channel Name | PID | Multicast IP address | Data rate (kbps) | Remark |
|---|---|---|---|---|
| TSL Announcement Channel | 100 | 224.223.222.223:4711 | 400 | Announcement channel |
| EUMETSAT Data Channel 2 | 300 | 224.223.222.21:2511 | 1481 | Primary High Rate SEVIRI |
| EUMETSAT Data Channel 3 | 301 | 224.223.222.23:2611 | max. 578 | Multi-service Europe/Africa |
| EUMETSAT Data Channel 5 | 500 | 224.223.222.29:3111 | max. 1420 | Secondary High Rate SEVIRI (RSS) |
| Info-Channel-1 | 100 | 224.223.222.34:3611 | max. 240 | General info, updates |
| Info-Channel-2 | 100 | 224.223.222.36:3811 | 240 | Daily logs, training, demonstration data |
| WWW-Channel | 100 | 224.223.222.40:4211 | max. 64 | WWW content |
| EPS-10 | 510 | 224.223.222.239:2390 | max. 3578 | Metop AVHRR |
| EPS-15 | 510 | 224.223.222.244:2440 | max. 485 | NOAA AVHRR |
Select current services by:
/usr/bin/dvbnet -p 100
/usr/bin/dvbnet -p 300
/usr/bin/dvbnet -p 301
/usr/bin/dvbnet -p 500
/usr/bin/dvbnet -p 100
/usr/bin/dvbnet -p 100
/usr/bin/dvbnet -p 100
/usr/bin/dvbnet -p 510
/usr/bin/dvbnet -p 510
Notice that some services has same PID number, next you will set its IP address. Check new interfaces by /sbin/ifconfig. There will be 9 new interfaces called dvb0_0 to dvb0_8.
Assign IP address
Each interface needs to have own IP address. Assign IP address with /sbin/ifconfig:
/sbin/ifconfig dvb0_0 192.168.240.238
/sbin/ifconfig dvb0_1 192.168.241.238
/sbin/ifconfig dvb0_2 192.168.242.238
/sbin/ifconfig dvb0_3 192.168.243.238
/sbin/ifconfig dvb0_4 192.168.244.238
/sbin/ifconfig dvb0_5 192.168.245.238
/sbin/ifconfig dvb0_6 192.168.246.238
/sbin/ifconfig dvb0_7 192.168.247.238
/sbin/ifconfig dvb0_8 192.168.248.238
Link it together through SMC router
First create new virtual interface dummy0:
/sbin/ifconfig dummy0 192.168.238.238 multicast
The address 192.168.238.238 is same as parameter interface_address in /etc/recv.ini.
Now start SMC daemon and assign service multicast addresses of each EUMETCast service (224.223.xxx.xxx):
/usr/local/bin/smcroute -d
/usr/local/bin/smcroute -a dvb0_0 192.168.1.1 224.223.222.223 dummy0
/usr/local/bin/smcroute -a dvb0_1 192.168.1.1 224.223.222.21  dummy0
/usr/local/bin/smcroute -a dvb0_2 192.168.1.1 224.223.222.23  dummy0
/usr/local/bin/smcroute -a dvb0_3 192.168.1.1 224.223.222.29  dummy0
/usr/local/bin/smcroute -a dvb0_4 192.168.1.1 224.223.222.34  dummy0
/usr/local/bin/smcroute -a dvb0_5 192.168.1.1 224.223.222.36  dummy0
/usr/local/bin/smcroute -a dvb0_6 192.168.1.1 224.223.222.40  dummy0
/usr/local/bin/smcroute -a dvb0_7 192.168.1.1 224.223.222.239 dummy0
/usr/local/bin/smcroute -a dvb0_8 192.168.1.1 224.223.222.244 dummy0
Check the route with ip mroute show:
(192.168.1.1, 224.223.222.244)   Iif: dvb0_8     Oifs: dummy0
(192.168.1.1, 224.223.222.239)   Iif: dvb0_7     Oifs: dummy0
(192.168.1.1, 224.223.222.40)    Iif: dvb0_6     Oifs: dummy0
(192.168.1.1, 224.223.222.36)    Iif: dvb0_5     Oifs: dummy0
(192.168.1.1, 224.223.222.34)    Iif: dvb0_4     Oifs: dummy0
(192.168.1.1, 224.223.222.29)    Iif: dvb0_3     Oifs: dummy0
(192.168.1.1, 224.223.222.23)    Iif: dvb0_2     Oifs: dummy0
(192.168.1.1, 224.223.222.21)    Iif: dvb0_1     Oifs: dummy0
(192.168.1.1, 224.223.222.223)   Iif: dvb0_0     Oifs: dummy0
Some network setup hints
If network setup is done and szap is running, check the data are transfered through interfaces and route with ifconfig. Each device count relayed RX bytes and TX bytes, all dvb0_x has non zero RX bytes and zero TX bytes and only dummy0 interface has non-zero TX bytes and zero RX bytes.
Pay attention to order of dvbnet commands and right address assign. You can see this in ifconfig listing.
For example NOAA AVHRR imagery, channel EPS-15 is dvb0_8:
dvb0_8    Link encap:Ethernet  HWaddr 00:D0:D7:12:6B:6F
          inet addr:192.168.248.238  Bcast:192.168.248.255  Mask:255.255.255.0
          UP BROADCAST RUNNING NOARP MULTICAST  MTU:4096  Metric:1
          RX packets:1179928865 errors:0 dropped:0 overruns:0 frame:0
          TX packets:0 errors:0 dropped:0 overruns:0 carrier:0
          collisions:0 txqueuelen:1000
          RX bytes:3859908873 (3.5 GiB)  TX bytes:0 (0.0 b)
          Base address:0x1fe
With bold is emphasized RX bytes, you see that interface is receiving some data. The Base address, here 0x1fe is in decimal 510, the PID of EPS-15. To convert hexadecimal numbers to decimal use command echo $((0x1fe)).
Stop the network
For DVB network switch off use following commands:
- Stop the SMR route daemon:
smcroute -k
- Stop network interfaces with ifconfig:
/sbin/ifconfig dummy0 down
/sbin/ifconfig dvb0_0 down
/sbin/ifconfig dvb0_1 down
		  ...
- Disable dvbnet:
dvbnet -d 100
dvbnet -d 300
dvbnet -d 301
		  ...
- Stop szap process:
killall szap
Now it is DVB network completely disabled.
EKU and Tellicast installation
For EKU and Tellicast installation follow the instructions from EUMETSAT on their CD.
There are two scripts you will copy to system directory /etc/init.d. They are called etokend and pcscd. Both use deprecated option LD_ASSUME_KERNEL, so edit both scripts find the lines which contains it and comment them:
# export LD_ASSUME_KERNEL=2.4.1
Same edit make in /etc/inid.d/tellicast-client, here comment lines:
# the kernel version to be assumed by the dynamic linker...
#LD_ASSUME_KERNEL=2.4.1
#export LD_ASSUME_KERNEL
Configure TELLICAST and check received channels
For this step follow the EUMETSAT documentation. You will add your recipent ID to /etc/recv.ini and also log_file, I use log_file=>&ght;/var/log/recv.log – the log file is stored in /var/log directory. For more detail debug information set log_level=verbose. Configure RAM disk (see section RAM disk) and finally select the EUMETCast channels).
Then select received channels in /etc/recv-channels.ini, the good tutorial for this is EUMETCast hints+tips. I recommend to use for each channel separated part, with this syntax:
[Data Channel Name]
priority=number between 0 (highest) to 1000 (lowest)
target_directory=path to received data
tmp_directory=path to temporary directory
The data channel names you can find on EUMETSAT pages. I recommend use for each channel it own directory. Because huge amount of files is received, then programs for image processing or file managers became very slow. Splitting files to more directories saves file system performance.
RAM Disk
Because hard disk I/O operation is bottleneck of the high speed data transmission of satellite data, it is necessary to setup RAM disk. I verified that without RAM disk is possible receive only one channel. When you add more channels for reception, then some amount of received files will be lost. Lost segments distorts image data.
Against that with RAM disk enabled should be received more then one channel and receiving software is more stable.
Kernel setup
RAM disk in GNU/Linux is enabled when system boots with parameter ramdisk_size=n kilobytes. Most GNU/Linux distributions use boot loader grub, with configure file /etc/grub.conf. Find the command with kernel parameters and add ramdisk_size. I found that 128 megabytes is sufficient.
Example of kernel parameters settings:
kernel /boot/vmlinuz-2.6.23.8-34.fc7 ro root=LABEL=/ rhgb quiet ramdisk_size=128000
The RAM disk will be enabled after reboot. Check it with command:
dmesg |grep RAMDISK. The kernel info about RAM disk is:
RAMDISK driver initialized: 16 RAM disks of 128000K size 4096 blocksize
Tellicast setup
For Tellicast setup change following parameters:
- In the /etc/tellicast-client.cfg enable RAM disk with
parameter:
RAM_DISK_DEVICE=/dev/ram0
- In the /etc/recv.ini edit these parameters
file_database_directory=path to RAM disk mount point

file_database_size=127000000
Note that file_database_size is little smaller than actual size.
The Tellicast will mount RAM disk automatically when starts. Mounted RAM disk check with command: mount. The important info in file system listing is:
/dev/ram0 on path in file_database_directory type ext3 (rw)
RAM disk problem – Invalid cross-device link
Don't set parameter tmp_directory in /etc/recv-channels.ini same as file_database_directory. I did this and no file were received, but log was full of messages like this:
ERR:2009-04-28 11:29:35.157:Cannot rename file "/mnt/ramdisk/49f6e93c014805c8.tmp" to
"/mnt/meteo_data/received/H-000-MSG2__-MSG2________-VIS008___-000001___-200904281130-C_"
(Invalid cross-device link)
I spent many hours of research and EUMETSAT help desk emailing before I found that tmp_directory and file_database_directory must be different!
Start reception
If DVB device is tuned, virtual network runs, it is possible to start file reception. You need to enable EKU and start tellicast-client. Run the starting scripts in this order:
/etc/init.d/etokend start
/etc/init.d/pcscd start
/etc/init.d/tellicast-client start
Now you can check the Tellicast. Start web browser and connect to http://localhost:2517. Check License, there must be your user id and host_key_4: ****-****-****-****, then EKU is running correctly. Without host_key_4: ****-****-****-**** there is some EKU issue, so check if red LED lights and pcscd and etokend are running.
Next check Active Channels, when reception is running the TSL Announcement Channel is Active and Data Channels will contain list of currently received channels. Look for Error in Data Channels table, probably is not properly set IP or PID if this error occurs. For automatic checking of EKU and reception see Monitoring.
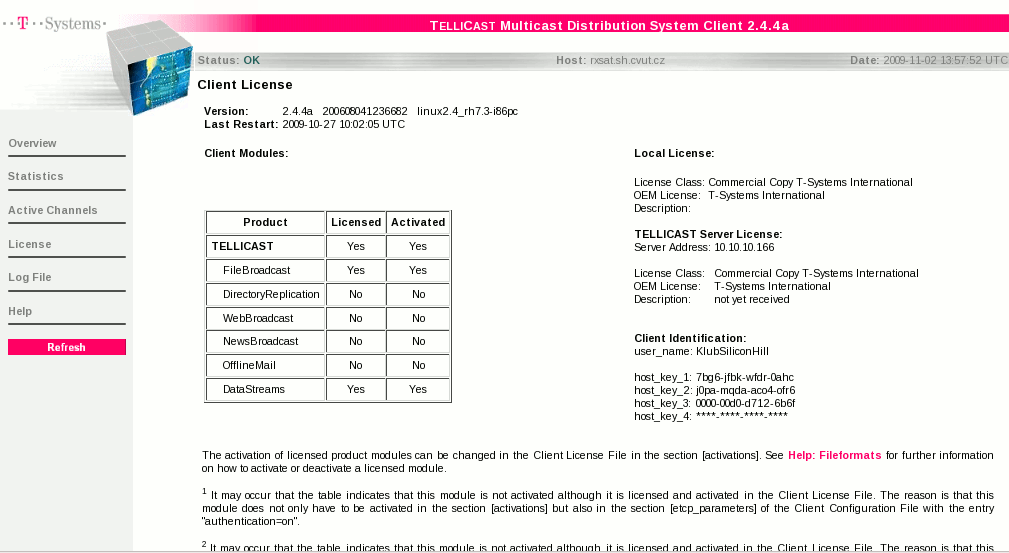
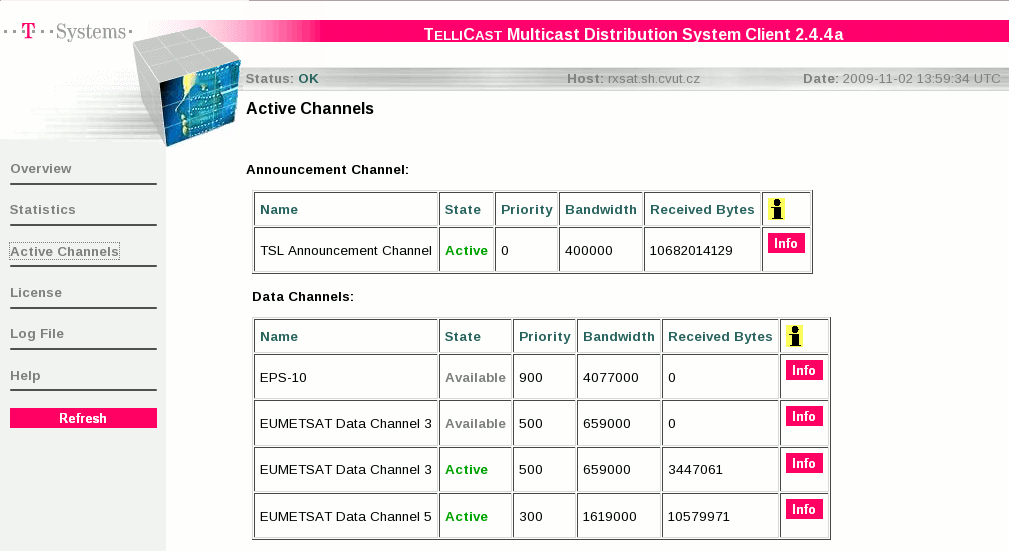
Figure: Two screen shots of running Tellicast – information about license and reception.
For further information check Log File, during few minutes of reception you will see many lines about received files, announcement or some error messages. Check the channels you receiving with:
grep '(subscribed)' /var/log/recv.log | sed -e 's/.*Received/Received/' | sort | uniq
And you will get list of subscribed channels:
Received announcement for channel `EPS-10', address 224.223.222.239:2390 (subscribed)
Received announcement for channel `EPS-15', address 224.223.222.244:2440 (subscribed)
Received announcement for channel `EUMETSAT Data Channel 2', address 224.223.222.21:2511 (subscribed)
Received announcement for channel `EUMETSAT Data Channel 3', address 224.223.222.23:2611 (subscribed)
Received announcement for channel `EUMETSAT Data Channel 5', address 224.223.222.29:3111 (subscribed)
Received announcement for channel `Info-Channel-2', address 224.223.222.36:3811 (subscribed)
Now reception it is running, and you can start with image processing!
All error lines starts with ERR:, so display possible errors with grep ERR /var/log/recv.log.
Monitoring and additional utilities
During computer operation I found two serious issues. First one is reception hang up and second is EKU communication problem (see part C4. EKU problems after successful installation: "Failed to decode key" .
Reception monitoring
After DVB stream interruption, e. g. due to bad weather condition the SkyStar2 card could hangs up. Frequency of this hang-ups was for me two per week, but after setup of RAM disk it looks, that problem disappeared.
When some errors occurs the Tellicast has watch dog and starts user defined script. You can configure it in /etc/recv.ini:
[watchdog]
error_script=/usr/local/bin/tellicast-error.sh
error_script_cause_announcement=60
When the reception hangs up, then the log file will be filled of some message lost and coordinator lost warnings. The option error_script_cause_announcement defines how many messages should occur before error script is processed.
There is an example of messages in the log file:
MSG:2009-11-05 19:19:33.406:Channel "EUMETSAT Data Channel 2": Lost message 486 (message lost)
MSG:2009-11-05 19:19:33.406:Channel "EUMETSAT Data Channel 2": Lost message 487 (message lost)
VRB:2009-11-05 19:19:34.440:Disconnecting from announcement channel `TSL Announcement Channel', address 224.223.222.223:4711 (Coordinator lost)
MSG:2009-11-05 19:19:34.440:Disconnect from announcement channel `TSL Announcement Channel', address 224.223.222.223:4711 completed (Coordinator lost)
VRB:2009-11-05 19:19:34.440:Reconnecting to announcement channel `TSL Announcement Channel', address 224.223.222.223:4711 (channel lost)
MSG:2009-11-05 19:19:35.441:Starting error script: "/usr/local/bin/tellicast-error.sh 0 1".
MSG:2009-11-05 19:19:36.441:Starting error script: "/usr/local/bin/tellicast-error.sh 0 2".
For DVB network restart create a script /usr/loca/bin/tellicast-error.sh:
#!/bin/sh

# command for network stop
/usr/local/bin/eumdvb_stop

# command for network start
/usr/local/bin/eumdvb_start
EKU monitoring
The problem with EKU communication causes lost of licence info, then no files are received. The symptoms of the problems are: the EKU is connected and lights, all EKU programs (etokend, pcscd) are running, but there is empty host_key_4 in Tellicast web interface in Licence section, normally there should be ****-****-****-****. There are plenty of messages Failed to decode key in the log.
The EUMETSAT offers simple monitoring utility monitor-eku-decoding. It is located on CD version 5.5 in Linux/Tools/monitor-eku.tar. This script periodically checks log file for Failed to decode key messages and if the message occurs the Tellicast and EKU daemons are restarted.
The order of programs stops and starts is following:
# stop the tellicast client, pcscd and etokend services...
/etc/init.d/tellicast-client stop
/etc/init.d/pcscd stop
/etc/init.d/etokend stop

# start the etokend, pcscd and tellicast client services...
/etc/init.d/etokend start
/etc/init.d/pcscd start
/etc/init.d/tellicast-client start
Automatic file erasing
In dependence on number of channels you are receiving, there is often huge utilization of disk space. Every hour is received hundreds of megabytes and the hard disk should get full after few days of reception. The best way to prevent this is periodically process the image data, store processed products as images and delete all unnecessary raw data from target_directory (specified for each channel in recv.ini.
For periodicallThe helper utilities are cron and find. Cron is standard UNIX daemon which periodically start specified program. Login as root and run command crontab -e and add a one or more lines like this:
 0 0 * * *     find /mnt/meteo_data/MSG/   -mtime +1 -exec rm -f {} \;
15 0 * * *     find /mnt/meteo_data/AVHRR/ -mtime +1 -exec rm -f {} \;
The 0 0 * * * describes time – every 00:00 the findlooks for files in specified directory (/mnt/...) older then +1 × 24 hours (-mtime and delete them. For disk loading balance is next find started every day in 00:15 (15 0 * * *).
For more info about cron studythis tutorial.